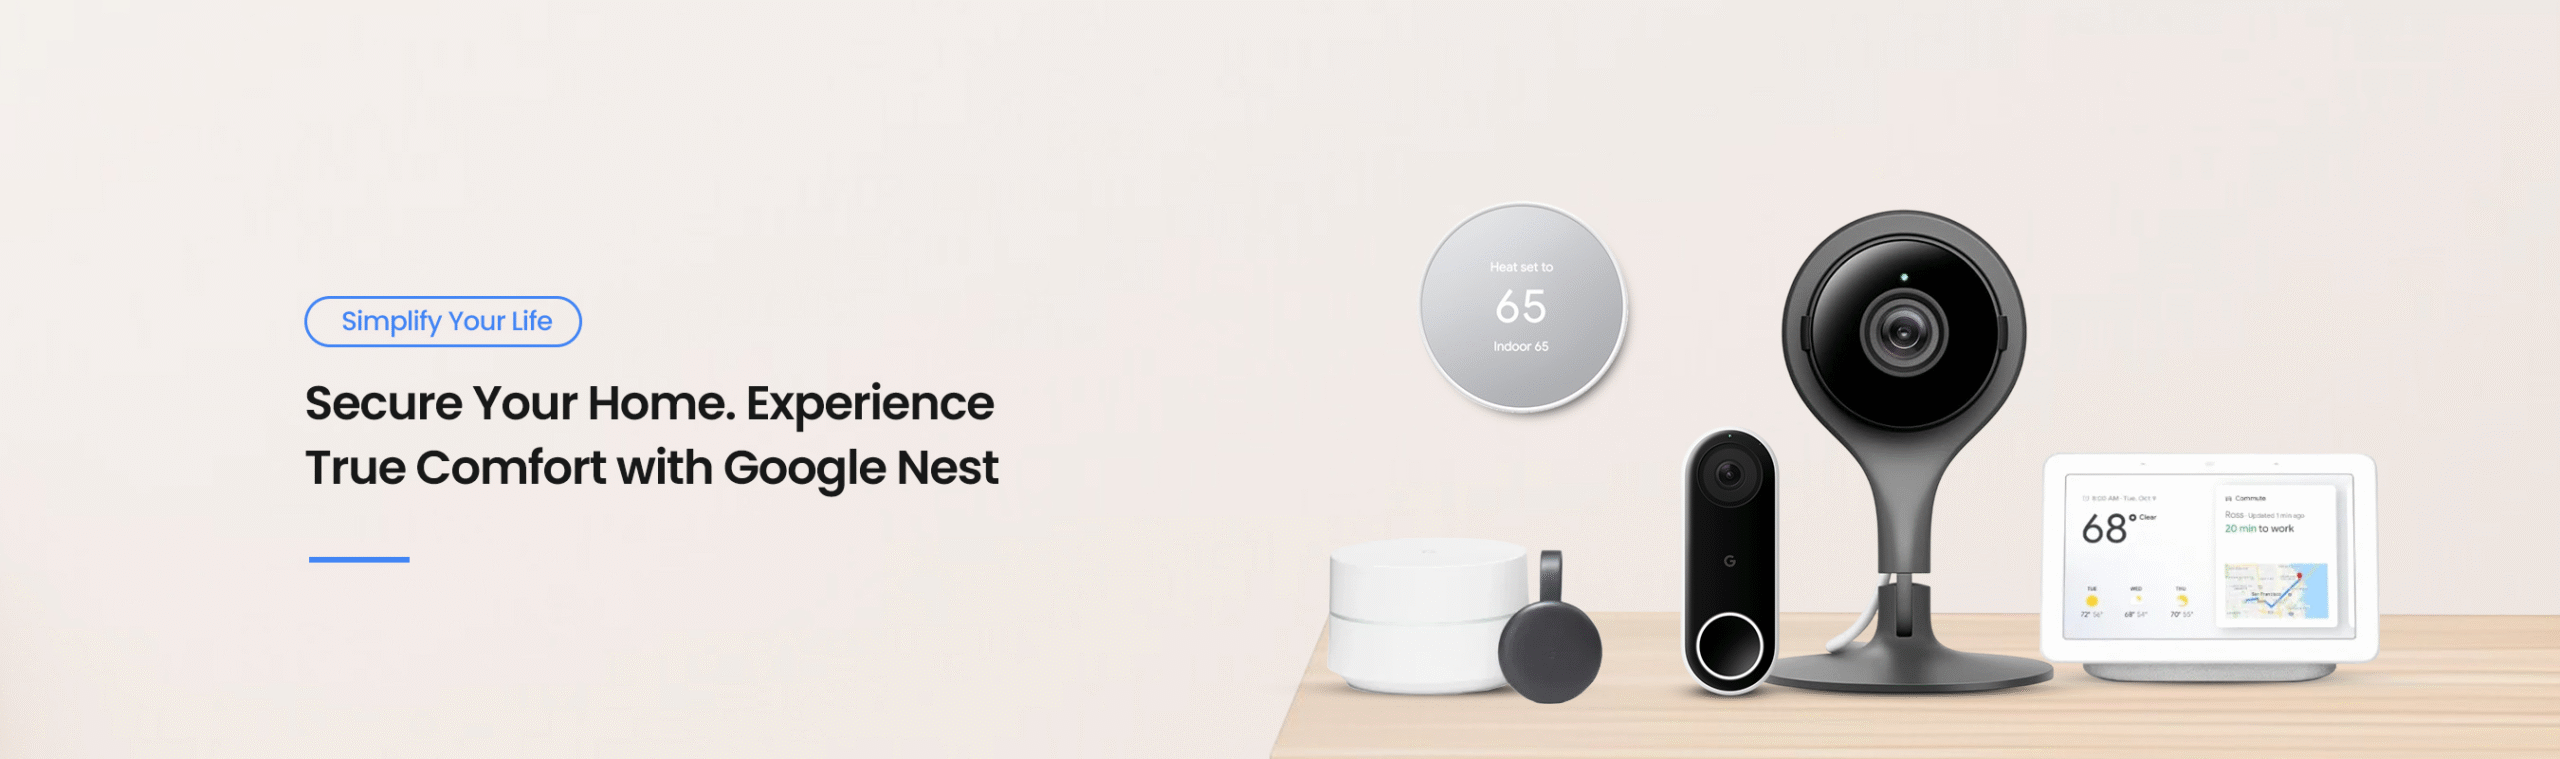
Install, Configure, and Troubleshoot Your Google Nest Thermostat with Ease
The first step in turning your home into a smart and energy-efficient environment is to have the appropriate devices. The Google Nest Thermostat is perhaps one of the most sought-after products among house owners, combining smart qualities with a cool design. To get the best out of it, you should follow the Google Nest Thermostat Installation process attentively.
Nonetheless, correct installation guarantees smooth integration with your HVAC system, Wi-Fi, and the Google Home app to provide comfort and control at your fingertips. If you want to know How To Install Google Nest Thermostat, walk through this post!
Basic Preparation to Install A Google Nest Thermostat
The comfort and energy efficiency of the smart home device is now more convenient than ever, and the Google Nest Thermostat is not an exception. Specifically created to automatically control the temperature in your home depending on your routine and preferences, it will save you on the energy expenses, and at the same time make your place of living comfortable.
However, when you buy this device for the first time, you must know some basic things to get it up and running effortlessly. So, here is the quick checklist to Install Google Nest Thermostat at home:

- First of all, you need a Phillips-head screwdriver, a flat-head screwdriver, and a drill with a 3/32 inch drill bit (optionally). Using these tools, you can pre-drill holes to mount the thermostat.
- The setup and configuration will also require a smartphone or a tablet with the Google Home app.
- Make sure your HVAC system works with Nest thermostats by entering your system into Google’s online compatibility checker. This normally involves the provision of required wires in your system, including the Common (C) wire, and generally avoids high-voltage wiring incompatible with Nest.
- To be safe, shut off the power to your HVAC system at the breaker before beginning.
- Furthermore, you must also be ready with the login details of your device.
Thus, with the preparation of these tools and the compatibility check, it becomes easy to install them and safe.
How to Install Google Nest Thermostat?
Undoubtedly, the Nest Thermostat provides both comfort and sustainable living with its smooth design, the possibility to use the Google Home app to control it, and the option to schedule it. One of the simplest methods of modernizing the control of your heating and cooling in the home is to install a Google Nest Thermostat.
Before installing the Thermostat Google Nest, unbox it and take out the included items. This section will walk you through the installation process step-by-step and will assist in making sure you get the compatibility, safe wiring, and insulated setup using the Google Home app to manage the climate smartly.
- Firstly, make sure that your heating and cooling system is compatible with the Nest thermostat by verifying through the Google Home app or the compatibility tool.
- Then, switch off your HVAC system at the circuit breaker.
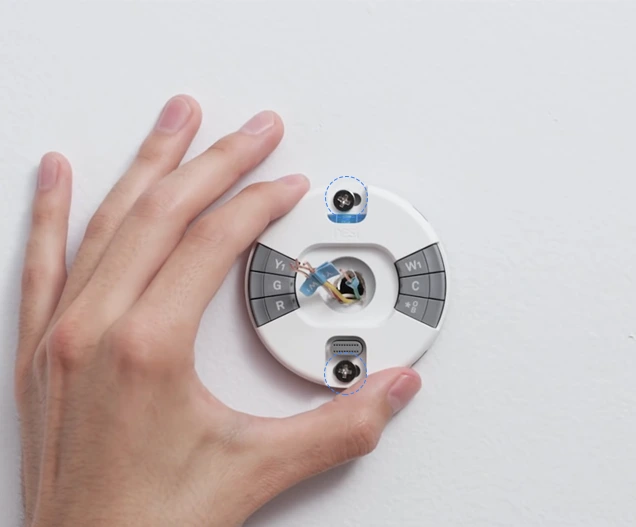
- Now, prepare a picture of the wiring of your current thermostat to have as a guide when removing its cover.
- Then, label all the wires that were attached to your old thermostat.
- Next, unscrew the wires and take away the previous thermostat base from the wall.
- Secure the Nest thermostat base to the wall, with a level to ensure that it is straight, and screw it in place.
- After that, attach the labelled wires to the corresponding terminals on the Nest base.
- Now, place the Nest display on the base and snap it on.
- Finally, switch on the power at the circuit breaker.
Ultimately, you can now use the Nest app or Google Home app to set up your Google Nest Smart Thermostat.
Note: The above process illustrates the steps for the 3rd-generation Nest learning thermostat installation. If you have the Thermostat E, use the same steps.
Installing the Google Nest Thermostat 4th Generation!
The installation of the Thermostat Google Nest 4th generation allows homeowners to upgrade to smart and energy-efficient climate control in a few steps. It is also intended to be a hassle-free experience, as it will require taking advantage of the Google Home app.
Additionally, the new Google Nest Thermostat With Sensor lets you schedule heating and cooling according to the areas you actually use. Therefore, this section is all you need to know about a successful installation, including compatibility of your system to be used and attaching and connecting your new Nest Thermostat.
Step-by-Step Google Nest Thermostat Installation
- Firstly, unpack your thermostat and remove the items from the box.
- It includes a display, base, a screwdriver, a steel plate, a trim plate, and screws.
- After that, switch off your thermostat to adjust its temperature.
- Then, remove the cover either by popping it off or by unscrewing it.
- Now, check the wiring of your system and make sure it has thick wires, nuts, and high voltage.
- After that, remove any jumper wires if there are any.
- Next, peel off the wire labels and attach them to the matching wires of your thermostat.
- You can also take a picture of the old wiring to remember it.
- Now, disconnect the wires and remove the base plate.
- Here, you need to take care if your HVAC system is turned off.
- Next, mark the holes to insert the screws to secure the Nest thermostat.
- You can also use the trim plate to cover the holes around the thermostat.
- Then, snap the base plate and trim plate together and attach the screws.
- After that, use the Google Nest Learning Thermostat Brass Wall Mount along with the plates on the electrical box.
- Next, attach the Nest base through wiring and then connect the wires securely.
- Then, press the display onto the base until you hear a click.
- Finally, power on your device from the circuit breaker and complete the setup.
Google Nest Thermostat Setup Using the Google Nest Thermostat App
Generally, the Google Nest Thermostat Set Up is performed using the Google Home app. But some users prefer the Nest app, offering an intuitive interface to control and configure the thermostat settings within minutes.
Moreover, the Google Nest Thermostat Setup via app assists you with connecting the thermostat, setting the preferences, and beginning to control temperature schedules to be energy-efficient and comfortable. If you want to set up the Nest Thermostat Google Home on your phone, follow these steps:
- Initially, ensure that you download the updated version of the app in the AppStore or Google PlayStore.
- Now, launch the app and create an account.
- In case you do not have a Nest account, the app will invite you to create a Nest account.
- After that, tap the settings on the home screen of the app.
- Now, click on Settings and further tap on the “Add product” option.
- Next, determine your thermostat model.
- Either scan the QR code on the back of the thermostat display or select “continue without scanning” and select your model manually.
- Now, the app will take you through the process of installing your thermostat and answer your questions about your thermostat wiring.
- Next, the app will create a unique wiring diagram based on your thermostat, and wiring will be easier and more individualized.
- Lastly, follow the guidelines appearing on the app screen to complete the Nest Thermostat Google Home setup.
Quick Tip: You can also integrate, configure, and control the Google Nest Thermostat with the Google voice assistants.
Google Nest Thermostat Set Up Via the Google Home App
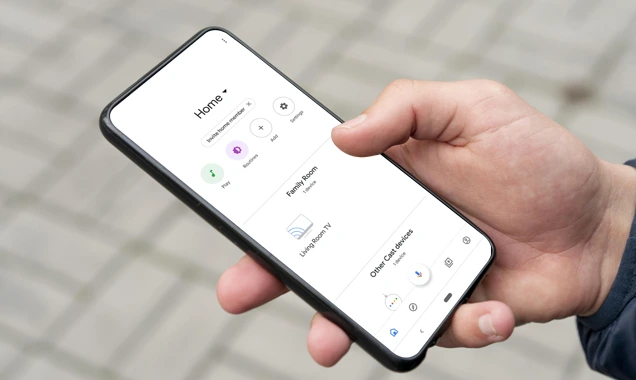
Here is how to set up the Nest Thermostat Google Home via the app:
- First of all, ensure that your device has a stable 2.4 GHz wifi network.
- Then, download and install the Google Home app on your smartphone.
- Now, create a Google Home account if you are a new user.
- Otherwise, access the dashboard using your existing login details.
- Further, click on the “+” icon on the dashboard and follow the prompts to add your device.
- Next, your app will look for the available devices to connect.
- Now, the app will ask you to select the device that you want to set up.
- Hereon, tap on “Nest Thermostat” and grant the required permissions.
- Similarly, scan the QR code or six-digit code to add your device.
- For further configuration and temperature adjustments, follow the in-app instructions.
- Lastly, the Google Nest Thermostat App setup is finished.
Account Management with Google Nest Thermostat
Additionally, to enable someone to remotely adjust your Google Nest Thermostat, you must share it via the Google Home app. It only takes a few simple steps to do so. Here is how you can Google Nest Thermostat Allow Another Account:
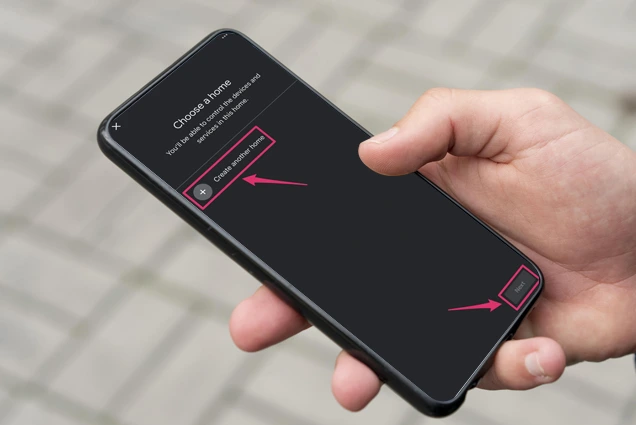
- First, log in to your device and add a new Home to the app..
- Then, click the new Home, and then go to Settings.
- Press the “+” button, type the email address of your invitee under “Invite person”.
- Once the invited individual has accepted the email invitation, they are able to access your Home on the app.
- At that point, they will be able to install/add the thermostat to the app.
When you do this, the account will be linked, and you will be able to control the thermostat remotely with them.
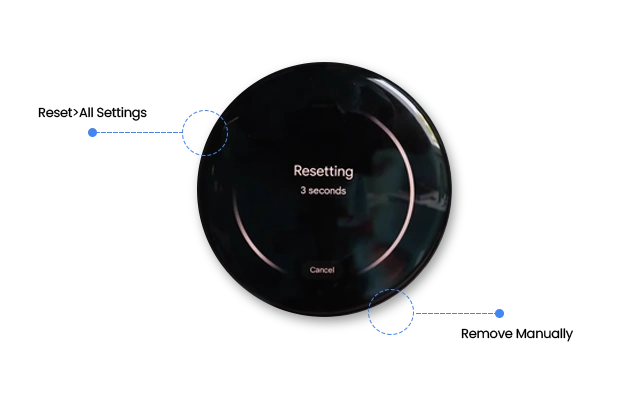
How To Remove Google Nest Thermostat Manually
Usually, removing the Google Nest thermostat is a quick process. You can do this in two ways, i.e., from the device menu or physically from the mount. If you want to know the quick steps to remove your device, you need to reset it. Here are the quick steps for removing your device:
- Initially, tap on the thermostat ring.
- Then, tap on Settings> Reset>All Settings> Reset> turn the ring, and the process initiates
- Wait for a while till the thermostat restarts again.
- Now, reconfigure your device from scratch.
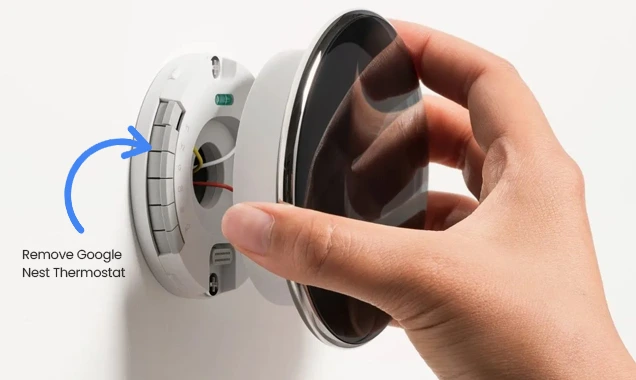
Remove Google Nest Thermostat from the wall mount
However, you can also remove or unmount your Google Nest Thermostat easily but cautiously to avoid breaking the device or wiring. If you want to know How to Remove Google Nest Thermostat from the wall mount, follow these steps:
- Initially, hold the two sides of the devices and slightly pull them.
- Now, reinstall it and align it with the pins gently.
- Further, you will hear a click when it fits properly.
- Then, you will see a warning message that your wiring has been changed.
- When your device is detected, tap continue, and your device will be working again.
- Finally, you can also change the settings of your device accordingly.
Quick Google Nest Thermostat Troubleshooting
Sometimes, your Google Nest Thermostat may not react to voice commands with Google Home because of connectivity issues or configuration issues. The most frequent ones are Google Assistant saying that it does not know where the thermostat is or does not understand you. To resolve these Nest Thermostat Google Home Commands Issues, try these tips:
- Firstly, make sure that your Nest thermostat is connected and authorized on the Google Home app.
- Then, unlink and relink your Nest account to refresh the permissions in the Google Home app.
- Most importantly, reboot your Google Nest devices, router, as well as your smartphone to clear temporary glitches.
- Then, test your Wi-Fi connection and Bluetooth connections, with the devices being close together and linked.
- Additionally, install the most recent update to the Google Home and Nest applications.
- In case there are persistent problems, use an alternative smartphone or reset the troubled device to factory settings.
Hence, these tips should fix voice commands and allow you to control the Nest Thermostat with your voice once again. In this way, you can enjoy the smart home experience a lot simply.
What to Do If My Google Nest Thermostat Not Working?
If your Google Nest Thermostat not working due to configuration, power supply, wiring, or any other issues, you can try these solutions to get it back working:
- Primarily, confirm whether your HVAC system is powered on.
- Also, make sure the circuit breaker is operational.
- Additionally, disconnect the thermostat screen and make sure that it is connected.
- Then, restart the device, and hold the thermostat ring until the device restarts.
- Further, check that your Wi-Fi is on and working.
- Moreover, connect to the Google Home app and update the software in the thermostat.
- In case the problem still occurs, then a reset (soft reset or factory reset) is worth considering.
How To Reset Google Nest Thermostat: Step-by-Step!
When all the above-mentioned troubleshooting fails, resetting your device can help get things going again. You can find the options such as Factory Reset Google Nest Thermostat, or simply Resetting Google Nest Thermostat to clear the errors or refresh connectivity, or wipe the device before installing.
The instructions on How To Reset Google Nest Thermostat are as follows:
- First of all, tap the thermostat ring to activate the Quick View menu.
- Then, go to Settings > Reset.
- Further, choose from the reset options:
- Restart - Without data loss.
- Schedule Reset- Removes scheduled programs only.
- Factory Reset- Erases all the data and settings.
- Further, make sure you have confirmed the decision and leave the thermostat rebooting.
- When the thermostat finishes rebooting, it is ready for the quick start.
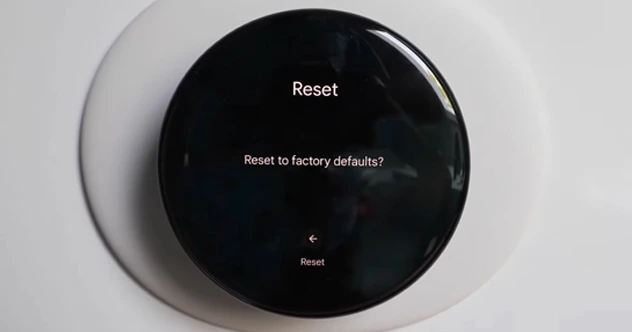
Google Nest thermostat- How to Factory Reset?
- Initially, tap the thermostat ring with your finger and tap Settings, then Reset, then All Settings.
- Then, press the ring to confirm it.
- Now, the reset process begins and starts erasing the data.
- Your thermostat will now erase schedules, Wi-Fi settings, and user data.
- Then, adjust the device with the help of the Google Home app.
- Finally, you have learned Resetting Google Nest Thermostat.